Tuesday, July 5, 2016

HPE Discover - Las Vegas 2016

I was invited to take part in the Hewlett Packard Enterprise (HPE) Discover event in Las Vegas recently. This event was overwhelmingly Data Center focused and as a result, a lot of the content was not something I could apply in practical terms.

After walking the show floor and participating in several demonstrations, my take-away was that HPE does not appear to be making the best use of the Aruba product line and the Meridian software solution. I did not see many people using the HPE app, instead relying on old fashioned face-to-face communications on the show floor. This year, the first time I launched the HPE Discover app and attempted to use it, my phone powered off and rebooted. Needless to say, I was not eager to attempt to use the app again during the event. 
I would like to have seen a big display of the location of devices on the show floor as an interactive portion of the general floor plans shown on the digital media signage on the show floor. It would have been interesting to use a touch screen interface to see the client devices, run reports on client types and client traffic utilization of the guest network as a way to showcase the Aruba wireless capabilities with Meridian. The last time I saw an impressive demonstration of the things capable with Aruba & Meridian was an Aruba Airheads conference shortly after the Meridian acquisition.


I found the small-cell partnership of Aruba Networks with Ericsson quite interesting. The Ericsson hardware is LTE & 3G, one unit is designed to be wall mounted and the Radio Dot is DAS only. AT&T and Verizon have deployed Radio Dot. As with the Cisco small cell solution, the products are getting hung up over the Service Provider approval. The big SPs are wary of giving any control over hardware procurement to any other hardware vendor.

Aruba had their lineup of new APs on display and the number and type of Ethernet ports on the access points got me to thinking. I'm dubious that the Access Point actually needs to have more than a Gigabit uplink any time soon, even if you can bond enough 5GHz channels together to offer more than a Gigabit in speed. First off, 160MHz wide channels will be a one off use case. It's not feasible to do a system wide deployment where all the access points are operating at 160MHz channels. Client devices can't achieve mondo speeds simply due to their spatial stream limitations, and the client devices that can hammer a wireless network - well, are they really hammering the network? Everyone I've spoken to in the industry says nobody (save one or two unique customers) is really hitting the maximum uplink speeds of an access point as an actual bottleneck. I get that some customers are future-proofing their networks, but by the time the client devices can beat down the multi-gigabit wifi deployed, it may already be time to refresh the access points that were deployed well ahead of the curve. Just my .02 cents.

The Aruba AP lineup lets you choose from from the AP 330 with one SmartRate (2.5GB) port, and one GB port, the 320 with two GB ports and the 310 with one GB port. The full feature comparison can be found here.

I'm grateful to HPE sending me to HPE Discover in Las Vegas. A great time was had by all! We all go the chance to learn about new offerings from HPE and have a little fun as well. Thanks Pegah!!
 

Tuesday, April 5, 2016

DIY Copy of Houzz Consigned Chinese Black and Red Moon Face Nightstand

People need a horizontal surface to put things on next to the bed. Not having nightstands was a glaring omission from our AirBnB. I did some googling to rectify this situation and found a set of nightstands that would match the overall Japanese/red-black theme of the apartment.

Well, I found these gorgeous nightstands on Houzz, but there's no way I'm willing to pay $900 for two (let alone $450 for one)!


I had an idea to find the cabinet hardware from Aliexpress (which was pretty simple) and then make the nightstands out of plywood with faux door and drawer openings. I don't need storage space in these nightstands, I just needed a place for people to put their things by the bedside. I used a big piece of paper to work out the balance of the drawer to door spacing for the front of the cabinet and traced on the lines with a pencil. Then using a chisel and a hammer, I made a groove on the fronts and sides of the cabinet where the "doors" and "drawer" would be. The plan was to fill in the groove with gold paint as the last step.


I used Rust-Oleum semi-gloss black paint for the body of the nightstand (the same paint I used on the headboard frame) and a red enamel paint for the drawer/doors.


After adding several coats of paint, I sanded with a 440 grit and then painted again. The door/drawer hardware arrived in the mail eventually. I installed the hardware and then painted the grooves gold with a fine tipped paintbrush and a gold paint I bought at Michael's.


I'm very pleased with how they turned out. They look great in the bedroom and the enamel paint is very hard wearing. I have about $100 or so in parts/paint/hardware invested in these nightstands, so it wasn't exactly cheap to make them, but it's certainly a lot cheaper than the ones for sale on Houzz.


Wednesday, March 9, 2016

From Concept To Reality - Queen Size Shadowbox Headboard

Say for example you've decide to join the bandwagon and turn the vacant apartment over the garage into an AirBNB (primarily because you don't want to be a full time landlord). All the AirBNB advice online says to make your place stand out, make it different, make it INSTAGRAM WORTHY. No pressure, right? Suure.

Through hitting up great estate sales, we'd settled in a Japanese theme for the apartment furnishings. Most of the furniture was in place and I'd already made the noren curtains for the front porch. The final thing I wanted to make a focal point was the headboard for the queen size bed. I'd researched ideas online but didn't find anything that fit with our theme. 

One morning I couldn't sleep. I woke up at 4:30 am, didn't want to get out of bed. I laid there and turned over ideas for a headboard in my mind. Discarding each iteration as taking too much time, costing too much in supplies or being far too complicated to execute.


I thought back to the geisha doll in a glass box that my mom used to have and thought THAT'S IT! I'll make a shadowbox headboard! I turned this idea over and over in my mind to imagine how it should look, what should be in the shadowbox? 

When it was a reasonable hour to get up, I went upstairs and drew the mock-up of the idea I had on my office whiteboard. The idea for the mountains, sun and cherry blossoms in the shadowbox came from the shutter stock banner graphics I purchased as inspiration for the noren curtains.


The noren curtains I made were inspired by those you see outside traditional ramen shops. I found UV resistant canvas fabric by the yard and a pattern (which I could modify).


Now that I've explained the history of the noren curtains, we can get back to the headboard. I then began researching where to buy a 30x60in piece of glass. Turns out a piece of glass that large is really, really heavy and expensive. Scratch that. Maybe clear vinyl might work? Researched that, found the stuff they put in sailboats for "windows". Nope. That's not right either. Turns out Lowes stocks 30x60 pieces of Duraplex for $45. Sold. That sheet of Duraplex is exactly the right size and won't require any cutting!

There's plenty of documentation online for how tall and wide a queen size headboard should be. I took that information along with the actual measurements of wood sold by Lowe's (a 2x4 isn't always 2x4) and began sketching out the pieces of wood I'd need to buy.
Many calculations later, I knew the finished headboard would be 57 1/4" tall, 23 1/4" from the bottom of the feet to the bottom of the shadowbox, and 65 1/2" wide. Basically I was centering the wood around the 30x60 Duraplex sheet and if anything wasn't quite centered, the nail holes would be covered up by the final trim I'd use to frame the edges of the Duraplex.
The sides of the shadowbox were 4x4 pressure treated fence posts and they were quite damp with the pressure treating chemical when I purchased them. I let them dry out for a few weeks (laying them flat on the garage floor). After two weeks' time, I cut the posts to size and sanded all the sides, prepping it for painting with Rust-Oleum Black Satin enamel paint.

I used a pocket jig for the screw holes because I didn't want screws to be visible from the outside of the headboard. I attached the top and bottom 1x4x10 board to the two 4x4 posts with two pocket jig/screw holes on each side (8 total, 4 top, 4 bottom). Not everything lined up perfectly, but I knew any imperfections wouldn't be visible once the headboard was complete, so I kept working. As long as all my wood was flush at the front of the shadowbox where the Duraplex would go, all would turn out well.

The shadowbox has tree branches (taken from the tree in the front yard) which I wrapped in strips of black satin (I already had 3 yards of inexpensive polyester satin on hand) and hot glue silk cherry blossom flowers to the branches (continuing the theme of cherry blossoms from the noren curtains on the porch)


The background of the shadowbox would be a section of the canvas fabric I had left over from making the noren curtains, painted with imagery of a large red setting sun and a large black mountain range opposite the cherry blossoms. The paint I was working with is by Jacquard and worked extremely well with the outdoor UV-resistant canvas.


David gave me the great idea of illuminating the scene with an LED light kit from IKEA, giving our guests the option of having the ambient light on or off in the headboard with a simple toggle switch.
The backing of the headboard is a section of hardboard which I spray adhered the canvas fabric to once the painting was completed. Working on the flat concrete floor of the garage, I used a rolling pin to firmly adhere the canvas to the hardboard and flatten out any uneven areas. I trimmed off any excess fabric with a razor blade and then used shiny brass trunk nails to secure the hardboard to the frame of the headboard. (no photos taken of this process as it took two people and four quick hands to apply the spray glue and smooth out any lumpy areas!
 
I used Gorilla Glue to secure the branches into a section of styrofoam glued to what would become the inside base of the shadowbox. I used strips of masking tape to hold the branches at the desired angles and depths while the glue set.
Once the glue was cured, I could then begin to attach the silk cherry blossoms to the branches. These are technically peach blossoms, but they had the look and colors I desired.

I used a snap blade knife to carve away some of the styrofoam rectangle, giving the base of the branches a more organic shape. Using the same black satin material, I cut a large rectangular section of cloth and began to cover the styrofoam base with it, securing the fabric with sewing pins.
Using the hot air from an embossing tool (rather than a heat gun, which would be too hot), I was able to make the frayed edges of the fabric covering the branches appear less messy. The hot air made the frayed edges shrink/melt/vanish.


The lighting section from IKEA was the perfect length to fill the center of the shadowbox with ambient light from beneath.

I drilled small holes every few inches apart at the perimeter of the Duraplex sheet. The diameter of the drill bit was big enough to allow for a small finishing nail, but not so large that the head of the nail would pass through the drilled opening. The sheet of Duraplex was affixed to the front of the shadowbox with finishing nails and David sealed any openings with crystal clear caulk (so no little critters could make a home inside the shadowbox).

The wood framing the front of the Duraplex sheet is a decorative pine trim from Lowe's, miter cut at the corners and an extra strip of thinner, similar wood trim at the bottom of the shadowbox to further obscure the light source.

The fence post finials are the Harbor design from Home Lumber Company on eBay. I bought the 4x4 size but I should've ordered the smaller size due to the dimensions of the fence posts not really being 4x4 but are 3.5x3.5. Not a huge problem overall.

I'm extremely pleased with how this project turned out! It has been a long time since I dreamed up something I wanted to make and had the time/ability/skills to see it to fruition! 


 There are still a few little things the AirBNB needs (end tables for the bed, for one) but overall it is nicely kitted out. The rest of the pictures of the place are on AirBNB!: http://bit.ly/minshuku


Tuesday, January 5, 2016

HPE Discover - London 2015

Recently Added-522

I was invited to take part in the Hewlett Packard Enterprise (HPE) Discover event in London recently. This event was the first expo since HP acquired Aruba. The event was much larger than I'd anticipated - there were at least 16,000 people in attendance. Dozens of demonstration zones were sprinkled throughout the show floor. 

The demonstration of MU-MIMO was well done through an animated video equating spatial streams and airtime fairness with fast, small and big cars traveling down the highway. The video was well done and would be useful for non-English speaking attendees of the event.

The show floor had stacks of networking hardware on display (in areas where there was no accompanying demonstration space) which I suspect would fall a little flat for the attendees who were not familiar with the newly aquired line of Aruba access points and wireless controllers. The diplay stack should have had signage to lead the attendee to where they can view this hardware in action or have an HP/Aruba TME explain the intracacies of the hardware.

I used the HPE Discover 2015 Tours application which was created for this event (for iOS and Android). The show floor had HPE(Aruba) bluetooth low energy (BLE) beacons distributed at the thirty-eight (38) strategic locations where the self guided tour could be utilized. At first launching the app crashed when I selected Demo 1212 "Securely integrate IoT deployments". When I relaunched the app, it worked and I was able to listen to the recorded narrator or read the transcript to get more information on the demonstration spot. Out of curiosity I searched the application for the four digit number on a nearby demonstration screen to see if that demo was also part of the app. My search results were blank, so I could only assume that it was not included. I think that the app should have been programmed to indicate that my selection was invalid or that the search query was not part of the app demo program.

The Collaboration demonstration of the interactive conference room was quite compelling. The demo tablets provided to the people taking place in the demonstration allowed their pseudonyms to be welcomed aloud by Cortana which was also launching the video meeting once all of the attendees were in the room. Once the conference started, lights on the outside of the conference room turned red to indicate the room was in use. When the conference ended, all meeting notes or chat session transcripts were automatically emailed to the attendees. The combination of the Aruba BLE beacon in the conference room with the Microsoft/Cortana enablement made a compelling story for automating conference call greetings as well as distributing the meeting notes automatically post onference call.

Recently Added-593
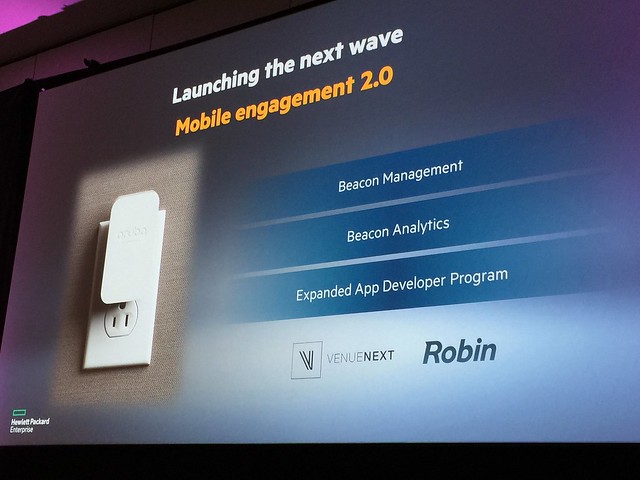
The big announcment from HPE Discover was the Aruba BLE Sensor (in my opinion). The Aruba Sensor is a device which plugs into any electrical outlet (the plug connector types are modular and are available for any plug type). It has a BLE beacon in it as well as a wireless capabilites which allow the sensor to manage up to 10 BLE beacons. This means that if a BLE beacon requires reprogramming, physical proximity is no longer required. The Sensors are managed through a web UI and changes to nearby Aruba BLE beacons can be done over the air. It is also possible to monitor the Aruba BLE beacon status from the same web UI as well as setup notifications/alerts when BLE beacons are no longer detected or if the BLE beacon battery status changes.

It is in the roadmap to bring this Aruba Sensor application into AirWave and use the mapping/location placment of the BLE beacons from the application into the single pane of glass management GUI which is AirWave. What is interesting is that the Aruba Sensors do not require an Aruba wireless infrastructure. Since the application which allows the remote managment of the Sensors and BLE beacons is standalone, it can be used in any wireless deployment situation.

The Aruba Sensor has a small form factor with a micro USB slot as well as an on/off power button (for regulatory compliance) as well as a four pin serial port interface. The serial port is to support legacy connections as well as debugging of the sensor. The BLE beacons that the sensor can manage are either small, standalone beacons which are battery powered, or USB beacons which are supported by recent models of Aruba access points.

I sat in on the session "How tomorrow moves: Mobile-first, cloud-first networking, transforming the digital workplace" led by Dominic Wilde VP of Product Line Management for HP/Aruba and he had a guest speaker (Doug Crawford VP of Global Network Services for WB/TimeWarner) who exolled the virtues of an all wireless office and how deploying a pervasive, location aware wireless infrastructure had enabled the WB to speed the turnaround time for wardrobe requests as well as catering deliveries. These two examples alone is saving WB thousands of dollars that would've been lost due to the length of turnaround time for these tasks previously. The are working to make the WB studio even more interactive through the use of BLE beacons at the major soundstages to bring video clips and interviews of who has used which soundstages and for which films or movies to the guests who are taking a backstage studio tour of the property. I think Mr. Crawford's presentation would have been more captivating and personal than the scenarios presented during the keynote.

My key takeaway was that the wireless capabilities that Aruba offers post acquision should have been highlighted more prominently at HPE Discover. I say this due to the large number of people who stood up and left during the Day One keynote when the topic of a mobile workforce became the topic of discussion. Many people seemed to miss the importance of the joint forces of Aruba and HP because they literally got up and walked out. It could be that all wireless offices haven't caught on yet in Europe (which I find hard to believe) or that the business use cases used during the keynote did not come across as compelling.

Full disclosure: HP/Aruba invited me to attend HPE Discover and paid for my airfare and hotel during my time in London for the HPE Discover event. I received gifts including an umbrella and jacket. The sponsorship of my travel or the gifts I received in no way influenced my opinion of the HPE Discover event.