Monday, October 18, 2021

Elvis Costello and Paul Weller as Puppets!


What happens when you catch me in the moment of being on a puppet making tear (having just shown off the newly minted Conny Plank puppet) and a dear friend says "IF I had any artistic ability whatsoever there would be Elvis Costello and Paul Weller ones.  They could fight for my heart, like Karate Kid.  Also if I wasn’t lazy.  Also if it wasn’t your brilliant idea."

Well, I said CHALLENGE ACCEPTED.

So it began.

Making the Small Fry body was the easiest part. The pattern is quite simple and I was already in the process of sewing one other caucasoid puppet, so adding two more to the batch actually made the process go smoother. Two I sewed together by hand and the third one I sewed on the sewing machine. Machine sewing the Small Fry body turned it into a nearly complete puppet (body, hands, legs, and feet) in just over 3 hours. Someday I'll learn the Muppet ladder stitch, but so little of their face seams are even going to be visible on these two puppets, I didn't sweat it too much.

I started on Elvis first because, in my opinion, he's pretty straightforward with regard to his visually recognizable markers. His teeth, oversized glasses, and excellent hair make it easy to turn him into a recognizable puppet. The part I was finding challenging was deciding WHICH LOOK to use as the guideline for his hair and clothing. Rocky said for him that decision was easy - the look he's got on the This Year's Model album cover. GOSH THAT'S EASY. Now I had something to work with for Elvis's clothing. Black suit, white button-up shirt with tiny grey polka dots, and a grey satin tie.


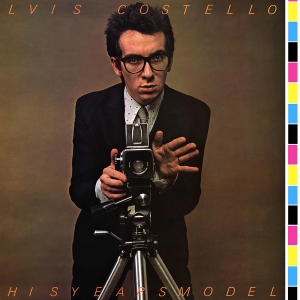
<insert image of this year's model cover>

I looked around online for suitable patterns for 18" dolls (they're comparable in size to the Small Fry puppet) and ended up buying a couple of patterns. There isn't much out there for Small Fry clothing patterns (yet) so I got to sewing and modifying the 18" doll patterns. The biggest issue with a pattern for an 18" doll is that the doll has a NECK and the Small Fry doesn't. Shirts and jackets don't fit as cut on the first try. I made a few mock-up dress shirts until I'd modified the dress shirt pattern well enough to look right and close at the top collar button on a Small Fry puppet. Here is a link to the Small Fry puppet patterns I've created through trial and error. I've included all the sewing instructions for the dress shirt and blazers.


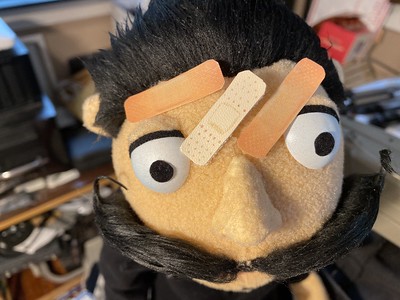
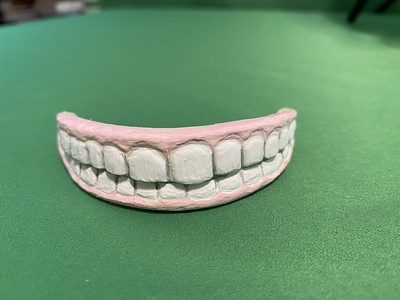
I sculpted Elvis's teeth out of some FIMO I had leftover from making puppet noses for Kraftwerk. It wasn't going to matter that they were not teeth colored color to start with. I scoured the internet for good photos of his nose and sculpted a tiny nose for him. Then thinking it might be handy to have a small reproducible puppet nose, I made a mold of it and used it for The Reverend Fred Lane puppet. I did a DIY flocking of the sculpted/cast nose to make it blend with the puppet fleece skin once the nose would be attached to the puppet face.

Elvis Costello's teeth and nose


I painted his teeth using acrylic craft paint I had on hand. The paint probably won't stand up to lots of abuse over time, but I don't anticipate that Rocky has a lot of hard use in mind for his Elvis puppet. While I was daydreaming about how I was going to affix Elvis's teeth to the puppet mouth I decided I didn't want to make them permanently attached so I made a new puppet and puppet mouth plate and used some small round magnets I had on hand to make Elvis's mouth plate attach the teeth MAGNETICALLY. I cut and glued little strips of magnetic metal to the backside of the upper and lower teeth. The magnetic teeth work like a champ. I'm thrilled.

Redoing the mouth plate (and puppet body) to make the teeth magnetically attach!

On the cover of This Year's Model, Elvis is standing behind Chris Gabrin's (the album photographer) Hasselblad 500 camera and tripod. As luck would have it, some scouring of the internet turned up a papercraft pinhole camera model of the Hasselblad 500. The original creator of the papercraft is Kelly Angood but her site doesn't host the file any longer. I found it on Scribd. I printed out the Hasselblad at an appropriate scale for the Small Fry puppet, making the camera dimensions around 1.5 inches. Putting the papercraft together was tedious, but I was happy that I wasn't trying to make a tiny, functioning pinhole Hasselblad 500.  

Papercraft Hasselblad 500

I measured the lens diameter needed and poured 4 exploratory lenses out of clear two-part resin. The first one worked like a champ. I did a light sanding to the edge of the lens so the UHU would hold it in place and then I googled to see what kind of aperture the Hasselblad has. I was on the fence about making it look exactly like the album cover, or making it true to life. I chose true to life. I printed out and cut the leaf aperture opening and glued it to the lens.


Papercraft Hasselblad 500 lens with leaf shutter

Now that the lens was in place, I made the rear of the camera attach with magnets and inserted a stabilizing base and threaded nut for a tripod mount inside the camera. Once the glue was dry, I painted the inside of the camera black (why not?).

Papercraft Hasselblad 500

I went looking on eBay for a Small Fry sized tripod that looked similar to the one on the album cover. I scored with a nice vintage Escot tripod in black/chrome with a handle that looked quite a lot like the one on the cover.

Papercraft Hasselblad 500 comparison photo

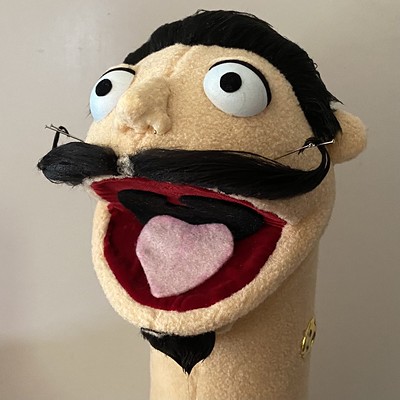
I completed his jacket with three working buttonholes and then cut his hair out of coal Mongolian faux fur from PuppetPelts.com (leftover from the Kraftwerk creations). I then attached his eyes, nose and then gave him a haircut.

Elvis Costello - looking good

Another search of eBay turned up a pair of perfectly sized, childs' hornrimmed glasses. When they arrived, I used some loose lenses from broken reading glasses to give Elvis's eyeglass frames something to hold onto and reflect the light.

Elvis Costello - yassssss

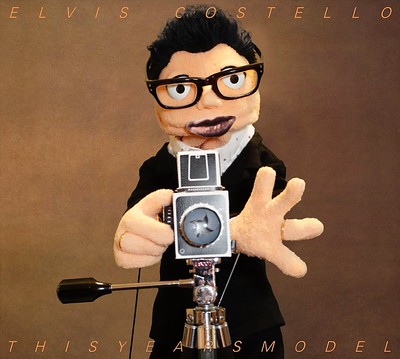
With his clothing, camera, glasses, and tripod complete, I was able to recreate the UK, US, and Swedish release album covers of This Year's Model.

UK Cover


Elvis Costello This Year's Model 

  US Cover

Elvis Costello This Year's Model

Swedish Cover

Elvis Costello This Year's Model

One more scouring of the internet turned up Axman - a woodworker in the UK who makes replicas of famous musician's guitars, including Elvis Costello's iconic Jazzmaster guitar (!!). Take my money, right?

Elvis Costello PUMP IT UP

The hard part was shooting a video of Elvis to replicate a tiny portion of the Pump It Up video. Green screen is hard y'all. Trial and error, shoot, re-shoot and then spend an inordinate amount of time in Adobe Premiere Pro masking around his feet to avoid reshooting again. I'm happy with how it turned out and it makes me laugh hysterically! That was the goal all along. 

I didn't send Rocky any process photos once I'd shown him a shot of the teeth pinned into place for a trial fitting (!). Keeping the pictures I've taken off the 'net and hidden has been sooo hard because I've been wanting to share each success I've had in this creation.

Here is the final video cut of puppet Elvis in all his glory in the Pump It Up video!


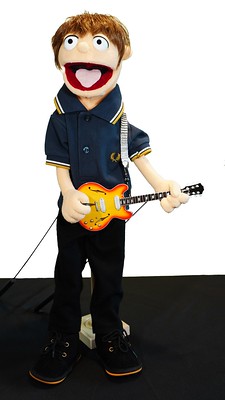
Creating a Paul Weller puppet was much less challenging by far. I found a tiny doll wig on AliExpress, made it a bit smaller by running a long stitch up and back around the scalp of the wig to "tighten it up" and make it fit the Small Fry better. I picked one of Paul's least-bad haircuts to give the puppet. I didn't have the heart to give him a severe hairline like I saw in most of Paul's earlier photos.

I found a tiny Fred Perry polo shirt on eBay, tailored it to fit Paul, and made him a pair of dark pants.

Paul Weller lookin spiffy!

Shoes were found on AliExpress and modified to be more like suede boots.

Paul Weller's tiny suede boots

I made Paul's nose a more traditional puppet nose - a bit of foam wrapped in fleece and sewn in place. I did some searching to see if he has a signature guitar strap (he does) and I made a tiny guitar strap to match the "real" one.

Paul Weller

I learned a lot in the creating of these puppets and I'm happy to have sent them to their new owner! I can't wait to see what Rocky does with Elvis and Paul!!


Wednesday, September 15, 2021

How To Make A Skydancer Tube Man (Tube Person)


Perhaps you've always wanted your own custom Skydancer but didn't know how to make one? Look no further. I will tell you how I made this Skydancer and what all of the measurements are and where I sourced the fabric and fan.

This drawing isn't exactly to scale, but it has all the measurements of the Skydancer you see pictured above. I also made one to model Wolfgang Flür from Kraftwerk. Here's the measurements for that Skydancer.

Kraftwerk Skydancer Measurements
If you have a serger sewing machine, making a Skydancer is fairly straightforward with this pattern. I used the Vitruvian Man drawing by daVinci as the source for the proportions between head/face/torso. The proportions work regardless if your Skydancer is wearing "clothes" or not.

This Skydancer pattern will create a Tube Man somewhere between 14-15 feet in height. Measurements are indicated in inches on the pattern and the process photos below will assist you in placing the openings for the Tube Man arms.

I ordered the 1.9 ounce ~70 denier ripstop nylon from HERE, the waterproof 600 denier fabric from HERE, and the 2-inch wide hook and loop (you'll need the loop side as the fan will have the hook side pre-attached to the circumference of the fan base) from HERE. The fan I have is a Big Bear B-Air BB1 but the current model is a BB3. Total cost of fabric + the fan is around $289. Given that custom Skydancers are priced around anywhere from $100 - $200 not including the price of the fan, you could easily make your own or hire the services of a local person with a serger sewing machine like mine to make the Skydancer for you. I have a JUKI MO 654DE but any serger type sewing machine will work for this project.

The ripstop nylon is 60 inches wide which is exactly the same circumference as the base of the B-Air fan. Create a thicker bottom attachment section with the 600 denier waterproof canvas. This is the section you will sew your 2-inch loop fastener strip to in order to connect the base of your Skydancer to the B-Air fan.

IMG_2422 

 I used a small salad plate (12 inches in diameter) to mark the arm openings. The arms taper to a 4-inch opening. The center of the "armpit" is 14.25 inches from the back seam (the fabric width including the selvage was 61 inches wide).

Here is what the loop strip will look like on your canvas bottom section. Sew a 60-inch strip around the base of the canvas section and then attach a hook and loop strip to each edge of the canvas 12 inch by 60-inch section to secure the canvas fabric closed once you've attached it to the base of the fan.

IMG_2415

You can make the facial features out of the same ripstop nylon, serge the edges and sew them by hand to the Skydancer as seen here:

IMG_2443

Here is the pattern for a basic Skydancer/Tube Man

SkydancerMeasurements
Here is the Skydancer in action!!


Friday, September 10, 2021

Rain Lamp Peak Plastic Fail and What You Can Do About It


Way back in April of 2019 the bottom of our rain lamp fell out and dropped 4 quarts of mineral oil on the dining room floor. The cleanup required a mountain of towels which will never come clean and will only ever be useful to turn sticks into torches. We were dismayed and uncertain as to how to fix the cracked plastic. The rain lamp base is the oil reservoir and attaches to the base of the rain lamp with three small bolts and acorn washers. The attach point for each bolt had completely disintegrated and there is no way I would trust a two-part epoxy to support the weight of 4 quarts of mineral oil.

Rain Lamp Cleanup

Rain Lamp Rag Pile

What did I do? I put off trying to fix it for ages (literally years). I had the idea to get a ring cut out of aluminum or sheet metal from a fab shop, but I was dubious that a shop would want to do a small one-off piece for a reasonable amount of money. The prospect of me cutting out a completely symmetric circle from a piece of sheet metal with a dremel was well outside of what I wanted to spend my time doing, so I just didn't do it.

Fast forward to the middle of the pandemic. I saw a person in the neighborhood with a 3D printer printing up loads of standoffs for face mask shields. I reached out to him and asked about the probability of him 3D printing a potential solution for my rain lamp problem. He said he'd try, and eventually I received three different shim types from him. One of the three shims seemed like it would work, but I only ever got the one shim 3D printed from him (I needed 3) and he hadn't responded to a message I'd sent in over five months. I took the one workable shim prototype and used it to cut 3 shims out of some K-S brass strips I had from another project.

rainlamp

IMG_2379

With my husband's help, we sanded down the shims to fit under the lip of the oil reservoir, marked and drilled the bolt holes for each of them, and reassembled the rain lamp with new, improved non-disintegrating, weight distributing brass bolt supports.

IMG_3351


If you have a rain lamp, beware that it is probably reaching peak plastic brittleness and you could find yourself with 4 quarts of mineral oil on your dining room floor. We were lucky that it happened while we were home, awake, and could quickly mitigate the large pool of mineral oil that hit the floor. If your lamp hasn't bottomed out yet, perhaps you should take a few moments and make some shims to prevent against a mineral oil disaster in your own home.

If you need to restring your oil rain lamp, I have a how-to for just that very thing!

Tuesday, September 7, 2021

The Reverend Fred Lane as a puppet!


As I was thinking over who I know that would appreciate a puppet of themselves and is also visually iconic, I came up with none other than The Reverend Fred Lane. The Venn diagram of people I know and who can be unmistakably rendered in puppet form is admittedly small, but I digress.

The Reverend Fred Lane as described by Wikipedia:
Tim R. Reed, known by the stage name Reverend Fred Lane, is an American, Tuscaloosa, Alabama-born singersongwriter, and visual artist, who released two relatively obscure yet critically appreciated albums in the 1970s on Say Day Bew Records, later re-released in the 1980s on the Shimmy Disc label. These albums explored various traditional genres of American music such as jazzcountry, and big-band swing, but infused with improvisational experimentations and Dadaist free-associative lyrics.

I first met Tim at the showing of the documentary of him titled Icepick To The Moon. David had clued me in to The Reverend Fred Lane many years prior and we were both thrilled to see the film and meet Tim in person! It was shown at the University of Florida. If you haven't seen it, here's a link to the trailer for it. It was super to see the documentary on Tim Reed and then have the opportunity to meet him and his lovely wife. The following year, we visited them both at their artists booth at the  Florida CraftArt festival in St. Petersburg, FL. He and his wife Jeanie are traveling artisans. He works in wood (mobile sculptures) and his wife Jeanie works in fiber and ceramic arts (mixed media).


I reached out to Jeannie and asked if having a puppet of his stage persona would appeal to Tim. She said yes (!) and I quickly began working on replicating The Reverend Fred Lane (TRFL) based on photographic evidence in the way-way back machine called the Internet.

The puppet pattern is the Small Fry pattern created by Adam Kreutinger. The fleece is from PuppetPelts.com (leftover from the fleece I used to make Kraftwerk). Once I had the puppet form created, I began working on creating The Reverend Fred Lane's stage props and costume accessories. I used a duplicate resin cast of a nose I sculpted for another puppet, flocked it with UHU glue and fibers cut from the fleece I'd used to make TRFL's puppet.

I documented the process behind making all TRFL's accessories and costuming in this Flickr photo album.

I ordered the smallest "straw" fedora and children's sunglasses that I could find on AliExpress. The sunglasses turned out to be just perfect. I knew the hat was going to be too big, but I hoped boiling it would make the synthetic fibers shrink up. I had no luck in shrinking the hat, so I cut up the hat according to a tiny fedora hat pattern and made a TRFL sized hat from a hat.
<insert hat photo here>

My pal Joel is a whiz with 3D printers, so I sent him a link to sunglasses on Thingiverse and said, can you make these sunglasses but have them be 2 1/2 inches wide? He said yes he could, so he sent me 5 print out in case I needed backups. As it turned out, my measurements ended up being much too small for TRFL's face. I was shooting for 'comically small' sunglasses but ended up with TEENY TINY sunglasses. Not a problem, I turned the teeny tiny sunglasses into a pair of earrings (!!) for Jeannie.

Bespoke 3D printed sunglasses

I used my Cricut to cut a sheet of ABS plastic into sunglasses, salvaged a pair of eyeglass hinges from a broken pair of sunglasses, and created the 'comically small' sunglasses for TRFL. It required much sanding and grinding with a Dremel because my Cricut is a Cricut Air, not a Cricut Maker. The Cricut Air is not powerful enough to cut all the way through the ABS plastic, I had to do the work to free the semi-cut parts from the surrounding plastic and grind them down to the 'engraved' lines the Cricut made in the ABS sheet.

Custom Cricut "cut" sunglasses

To get the right look for TRFL's band-aids, I made three prototypes. I used ink-jet printable heat transfer material to get two sets of band-aids on a sheet of white fabric. One prototype used Mod Podge gloss to glue a layer of thin clear vinyl to the band-aid image to make it shiny, the second prototype used layering of the Mod Podge gloss to create several layers of Mod Podge to create a shiny band-aid surface. The third prototype used a beige vinyl fabric and permanent fabric markers to make the band-aid perforations and gauze pad center. The beige vinyl band-aids looked the best against TRFL's head! I used Fabri-TAC glue to adhere heavy-duty Velcro hook squares to each end of the band-aid; leaving the gauze section in the middle of the band-aid free from Velcro. This allowed me to criss-cross the band-aids on TRFL's face as is his stage wear.

Which band-aid is best?

As luck would have it, I found a paper-craft globe online and it was already sized proportionately to TRFL's puppet size.

He's got the world on a string

I used this photo of Mattel's Tommy-Burst Detective Set to replicate the toy Tommy Gun TRFL is seen sporting in photographic history.

Papercraft Tommy Gun for The Reverend

PEX tubing made the frame of TRFL's tricycle possible. Silver and red spray paint made it complete. Tiny pedals made out of FIMO gave TRFL something to perch his tiny feet upon.

Fimo pedals to push on

His hair was cut from a scrap of faux fur, sewed into place and then a suitable haircut was given. After his first hair cut, I fashioned a wispy mustache and goatee which could then be 'waxed' into a twist.

VOILA

For his final million-dollar grin as seen on the cover of "From the One That Cut You" I sculpted his grin out of a section of PVC pipe with various Dremel bits and grinder tips. A base coat of paint was applied to his teeth and the final paint layer added pink to his gums and a bit of grey shading between his teeth to make the depth of them pop visually.

THE BOLOPHONIC GRIN

I had a ton of fun making all of TRFL's accouterments and I am happy to hear that Tim is as pleased with himself as I am!

He's got the world on a string and Anne Plastic Ear.

The Reverend Fred LaneThe Reverend Fred Lane

Wednesday, September 1, 2021

Adam Kreutinger's Small Fry Puppet Clothing Patterns


I have been making Small Fry puppets from Adam Kreutinger's pattern and modifying doll clothing patterns to fit the measurements of the Small Fry. The Small Fry doesn't have a "neck" that is smaller than its shoulders, and as such, 18-inch doll clothing patterns require modifying to fit the Small Fry's proportions.

This post is about the formal suit jackets and dress shirts I made for the Small Fry. The suit jacket pattern has three different collar styles and two different fit styles in it. One is more of a Pea Coat fit, bigger in the overall sizing and with a wider lapel. The other fit is more true to the Small Fry measurements and I have included a 1950's style Peak lapel and a smaller Mod notched lapel style.

The dress shirt has two different collar styles - a traditional straight collar and one with a bit longer collar points as seen in the polka-dotted dress shirt photo. The sleeves are intentionally about a half-inch long for the Small Fry arms, adjust your pattern as you desire for sleeve length.

The patterns all include a 1/4 inch seam allowance. When a 1/8 inch sewing edge is called for, it is indicated in the pattern instructions.

If you download and use these patterns and instructions, I'd love to see what you've made with them!

I will be editing and uploading the dress pants and boxer shorts I made for the Small Fry puppet soon.