I've recently integrated Jacquard deColourant into my concepts/creations. The deColourant is a non bleach chemical that non-destructively removes the dye from darkly colored natural fabrics that have been dyed with a "dischargeable" dye . It allows you to create a white area on a dark shirt that you can then apply your image to. It works by being sprayed, brushed or stamped onto the dark fabric, allow it to dry and then apply steam heat from an iron and the fabric turns white!! If the deColourant is spilled on a surface where you do not want it to be, just wash the garment in that area (or the whole thing) because nothing happens until you apply heat.
In the Amazon reviews for the 8oz bottle of the deColorant, Dennis S. mentions using his laser etcher tool at high speed and very low power to create an image in the area where he applied the deColourant. Using this directed heat method is the same concept that's used in fax machines and thermal paper. You'd use your laser etching machine to "etch"/heat a negative image into the deColorant area. I haven't seen anyone else anywhere mention using a laser engraver as a pointillized heat source to be used with the Jacquard deColourant. His results are amazing and show the potential of what is possible.

I received a second hand Glowforge Pro for my birthday & dug into how to achieve something similar to the image from Dennis. I cut up a spare t-shirt, coated it in a layer of DeColourant, let it dry and then started running test strips. I was trying to max out the speed and run the job at the lowest speed, based on what little Dennis included with his photo. The thing I didn't know at the time was that when the Glowforge is set to the highest speed, the size of the laserable area is reduced (a smaller canvas area). This means that my excellent test data is somewhat invalidated because I want my final image to be bigger than the area that is available when the Glowforge is running at 4000 speed. Also, some of the higher speed settings aren't available depending on the file type being used to engrave. No, I haven't read the manual yet, but I'm working on it as I bump up against hurdles like these. The test sheet below required further adjusting to balance the "canvas area" with the available speeds/powers.

My findings to date. These settings achieve a good reduction in the shirt color where the laser hits the deColourant as applied to the shirt. I used white masking tape cut into arrows to indicate the corners of the rectangle where I applied the deColourant to the shirt so I can see the rectangle where I want to "print" the image in the Glowforge preview of the bed image.
Using a PNG vs a SVG achieves minimal reduction in laser "print" time. I see no benefit in using an SVG over a BMP or a PNG for this use case.
Glowforge Settings for reliably good "prints"
Speed 2600
Precision Power 15
(sometimes I think my power settings are a bit hot, but when the shirts are washed, they look fine)
Grayscale Vary Power
Min Power 3
Margin Optimization 100%(maximize quality)
Lines Per Inch 225
Number of Passes 1 pass
Focus Height Auto
I would like to speed up the process and will look into how I can increase the "printable" image size and achieve higher laser speeds.
I used the tutorial by Bailey (MyDogsThinkImCrazy) to make magnetic risers & use a magnetic erase board as an adjustable surface rather than having the crumb tray in place inside the Glowforge. She gives the background on the 3D printed risers and the magnetic whiteboard & ceramic magnets to use here.
The different heights of risers are to be used when engraving in items that wouldn't fit in the Glowforge if you were using the crumb tray. This is her post on engraving things without the crumb tray. Using the risers allows me to tuck the extra fabric of the t-shirt underneath the magnetic white board and secure it in place with a few magnets & painter's tape on the bottom of the magnetic white board. Ignore that the rectangle where the deColourant was painted looks grody. It doesn't matter in the slightest when it is getting lasered. It does help to dry the area a bit with a hair dryer set to COOL no heat (deColourant is heat activated). I've tried lasering deColourant when it was still wet and I was getting inconsistent results.

My risers are made out of scrap wood (I don't have a 3D printer), glued and stacked to achieve the various heights of risers (1.4, 1,2, 1 and .8 inches high) I engraved one layer and cut out a circle in one layer to have enough room for the thickness of the magnet to be flush with the wood of the riser (the magnets are .2 inches thick).

The Cricut cutting mats have a similar grid layout to help you place your vinyl and the things you're cutting - the Glowforge does not have this X,Y location feature - but the post by Bailey tells you how to make your own grid and then the aberration from the Glowforge fish eye bed lens will not affect the accuracy of your desired cuts/engraves/scores. In this post she includes a PDF that shows how you can make your placement jigs for the grid board out of universal interlocking plastic bricks!
I paint on the deColourant with a small paint brush, being sure to saturate the fabric of the shirt. I then use a hair dryer on the NO HEAT setting to dry the deColourant before placing the shirt in the Glowforge. Most of the shirts I've made take anywhere from 30 - 60 minutes to fully render (line by line). If the power settings were lower or the image were smaller or I were printing at a lower lines per inch measurement the process would go quicker.
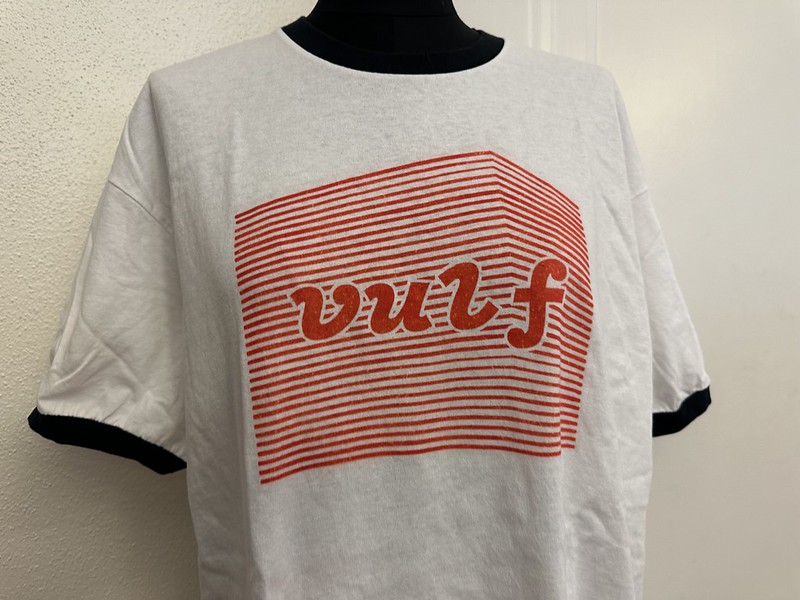
Here is a photo of what I'm calling successes with deColourant and the Glowforge. I'm pleased with how these shirts have turned out and as I work with these two tools more, I'm certain that I will learn more about what images transfer best with deColourant and how I can adjust the image and Glowforge settings to get the best "print."
Shirt blanks from PressHall.com
5000 Gildan 5.3-ounce 100% Cotton T-Shirt <-turned out well, lightened to a grey
PC54 Port & Company Core Cotton T-Shirt <-turned out well, lightened to a grey
DT6402 District Women's V.I.T. Boxy T-Shirt <-nice soft fabric, lightened to a sepia tone