Showing posts with label Unrelated. Show all posts

Friday, September 10, 2021

Rain Lamp Peak Plastic Fail and What You Can Do About It


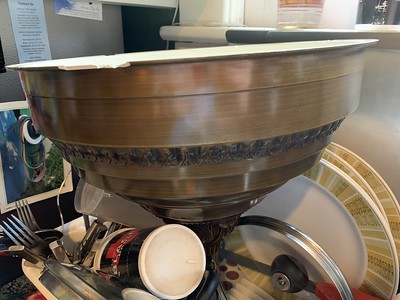
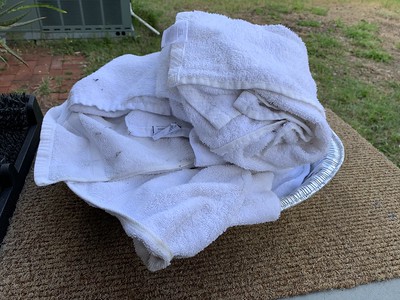
Way back in April of 2019 the bottom of our rain lamp fell out and dropped 4 quarts of mineral oil on the dining room floor. The cleanup required a mountain of towels which will never come clean and will only ever be useful to turn sticks into torches. We were dismayed and uncertain as to how to fix the cracked plastic. The rain lamp base is the oil reservoir and attaches to the base of the rain lamp with three small bolts and acorn washers. The attach point for each bolt had completely disintegrated and there is no way I would trust a two-part epoxy to support the weight of 4 quarts of mineral oil.

Rain Lamp Cleanup

Rain Lamp Rag Pile

What did I do? I put off trying to fix it for ages (literally years). I had the idea to get a ring cut out of aluminum or sheet metal from a fab shop, but I was dubious that a shop would want to do a small one-off piece for a reasonable amount of money. The prospect of me cutting out a completely symmetric circle from a piece of sheet metal with a dremel was well outside of what I wanted to spend my time doing, so I just didn't do it.

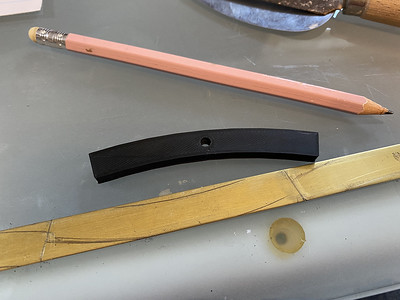
Fast forward to the middle of the pandemic. I saw a person in the neighborhood with a 3D printer printing up loads of standoffs for face mask shields. I reached out to him and asked about the probability of him 3D printing a potential solution for my rain lamp problem. He said he'd try, and eventually I received three different shim types from him. One of the three shims seemed like it would work, but I only ever got the one shim 3D printed from him (I needed 3) and he hadn't responded to a message I'd sent in over five months. I took the one workable shim prototype and used it to cut 3 shims out of some K-S brass strips I had from another project.

rainlamp

IMG_2379

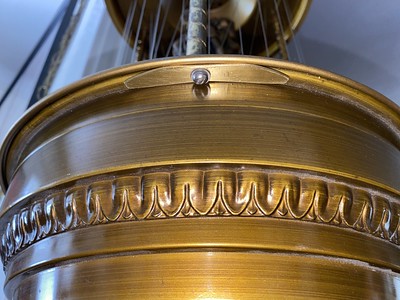
With my husband's help, we sanded down the shims to fit under the lip of the oil reservoir, marked and drilled the bolt holes for each of them, and reassembled the rain lamp with new, improved non-disintegrating, weight distributing brass bolt supports.

IMG_3351


If you have a rain lamp, beware that it is probably reaching peak plastic brittleness and you could find yourself with 4 quarts of mineral oil on your dining room floor. We were lucky that it happened while we were home, awake, and could quickly mitigate the large pool of mineral oil that hit the floor. If your lamp hasn't bottomed out yet, perhaps you should take a few moments and make some shims to prevent against a mineral oil disaster in your own home.

If you need to restring your oil rain lamp, I have a how-to for just that very thing!

Friday, August 6, 2021

Things I've Made That I Haven't Told You About Yet

I'm going to assume you're curious about the things I've made, otherwise, you wouldn't be reading this post!

Scrolling back through the photos on my phone, I'll make my list chronological.

Lenny 4 part spray paint stencil (4/19)
This photo is the foundation for the stencil
Lenny was a magical feline who was FLV+ and lived a brief life of adventures, sunsets and I commemorated his portrait in a multi-part spray paint stencil. I used Sara Sandoval's excellent how-to video on YouTube.

Kraftwerk Skydancer 5/19 - this has already been documented and discussed. 

🤖


Ecstatic Dance Sunshade (6/19)
IMG_2182
My friend Laryssa was the organizer for the Tampa Bay Ecstatic Dance gatherings and she said "What if I had an Ecstatic Dance sunshade for my car? Then I could put fliers in my dash advertising the next dance date, price, and location - every place I parked." I thought this was a genius idea so I bought a cheap silver foil sunshade from the Dollar Tree, used an old white sheet, my Beam projector, and permanent fabric paint to recreate the Ecstatic Dance artwork Laryssa used on her event flyers.

Mighty Boosh Halloween costumes (6/19)
FullSizeRender
I got obsessed on Halloween early in 2019 and made David and I costumes so we could be Howard Moon and Old Gregg. We went to the Tokyo Motor Show instead. These costumes will be revisited at another Halloween...

Buster Keaton shirt (6/19)
Buster Keaton Shirt
David is a big fan of Buster Keaton, so I found a high res photo online, bumped up the contrast, and turned it into basically a stencil. I used the Beam projector to shine the picture on the shirt, traced it, and filled it in with permanent fabric paint in navy blue on a really nice vintage ringer tee we scored at the Salvation Army.


The Reverend Fred Lane BOLOPHONIC shirt (1/20)
Bolophonic Fred Lane Shirt
I made my BOLOPHONIC shirt to wear to the historic concert with Fred Lane and His Disheveled Monkeybiters at Saturn in Birmingham, AL. After the show, I made a hoodie for a guy I met at the concert who came up to me and was like "WHERE DID YOU GET THAT SHIRT?!"

Pandemic masks (so many masks!) (4/20)
IMG_6803
I know how to sew and had a lot of fabric already on hand when masks weren't something you could find or buy. So I made masks. Lots and lots of masks.

Holliday Bakes lettering for A-frame sign (7/20)
IMG_8214
My friend Chriss Holliday had a pop-up bake shop in Seminole Heights (she's now in Tallahassee). She'd gotten the metal and the stand for the sign and I put her signage on the stainless steel sheet metal with vinyl I already had. The Cricut makes so many things possible.

All Y'All Yoga tank tops (8/20)
all yall tanks
These were two designs I came up with for All Y'All Yoga tank tops. One is a mashup of the YES YES Y'ALL font for Toronto's long running queer party and the other is a mashup of a Baptiste yoga tank font and the All Y'All font.

Journey Into Power window clings (8/20)
IMG_8123
These JIP figures have evolved over the years. Originally I purchased yoga stick figures online, added in the poses from JIP that weren't in the set I purchased. Then EB asked if I could make the figures into window clings. I could - but I took each of the JIP poses into Adobe Fresco and thickened and smoothed the lines of the stick figure so that the Cricut could cut each pose out cleanly.

Kraftwerk puppets - (8/20) documented here.

Disco ball trailer hitch cover (of course) (9/20)
disco ball hitch cover
I ordered a couple of bags of tiny mirror squares and used Mod Podge to glue them to a trailer ball hitch cover I'd purchased. Why have a boring trailer hitch cover if you don't have to?

Press Your Luck Leggings (9/20)
IMG_8946
I always loved watching PYL when I was home sick from school or during summer break. I used the leggings pattern from Society 6 to make a pair of PYL leggings for me. I was surprised to find that the sizing for the XL leggings had changed A LOT since I made/ordered my Frogger leggings. I had to add an extra 4 inches to the rise because the torso of the leggings was way too dang short.


Rocky (from Buffalo '66) Shirt (still a work in progress) (12/20)
Rocky
This is still a work in progress. The first attempt at making a vector from movie stills didn't cut well on the Cricut. The vector lines were too thin and didn't cut properly. I'll revisit this again because I love Rocky's character in this movie.

Soliloquy For Lileth shirt (10/20)
IMG_9148
David ordered a Soliloquy for Lileth shirt off of AliExpress and we were both disappointed that it wasn't a gold foil graphic. It looked more like an army green sort of color so I made three SFL shirts and now David, Sosh and Erin are all proud owners of proper gold foil SFL shirts.

I got vaxxed at the dog track shirt (3/21)
Vaxxed at the dogtrack
I made this tank top to commemorate my vax status. The decommissioned Dog Track up the street from us was the site of the FEMA vaccination distribution site and I thought it was an odd and somewhat humorous location for a vaccination site.

WWT magnetic logos (makes any button up shirt a corporate edition!) (3/21)
WWT Magnetic Logos
I made myself a WWT magnetic logo to wear on my shirts when on video calls. I picked up a couple of nice button-up shirts from the Salvation Army. I used my Cricut to cut the silhouette of the WWT logo out of hotel keycards, scraped off the top layer of plastic to reveal the white of the card. Then cut vinyl in red and blue. I used a paperclip hot glued to the back of the logo to make the logo magnetic. This makes any dress shirt a fancy work shirt. I received a lot of compliments and questions about where I'd gotten my WWT shirt from other co-workers. I made some extra for friends at work.

Whiskey Barrel Hoop Drum (4/21)
whiskey barrel hoop drum

Braided ribbon barrettes (6/21)
ribbonbarrette
I'd been missing seeing these cute braided barrettes in ladies' hair so I made myself a few. I volunteered to lead a barrette braiding class at the local community center and one lucky little girl went home with 6 brand spanking new fancy braided and beaded barrettes.


Brass shims for rain lamp oil reservoir base (6/21)
rainlamp
The plastic bottom of our rain lamp cracked in April of 2019 and we had a mineral oil disaster in the dining room. The bottom of the rain lamp containing 4 quarts of mineral oil gave way (peak plastic failure) and our dining room was suddenly covered in said quantities of mineral oil. I was unsure about how to fix the broken segments. My thought was to cut a ring out of some sort of metal and support the base of the lamp with a metal ring. I didn't want to spend the time to cut out a ring with a dremel, so I put the project on hold.  In September of 2020 I reached out to a local person with a 3D printer and he printed up a couple of different styles of support shims. One of them seemed like it would work, but he only printed one for me. I had a hard time getting ahold of him to get more printed so I got frustrated and used some brass strips I had to replicate the shape of the 3D printed shim. David helped me get the holes drilled in the right spots and now our rain lamp is back up and operational.

Conny Plank puppet (7/21)
Conny Plank
With the launch of the Kraftwerk Puppets, it was only natural to make a Conny Plank puppet. No band would be complete without their chief engineer and producer!

All Y'All Skydancer (7/21)
IMG_2733
Charlotte is a big fan of sky dancers and we were talking after the All Y'All open house event in July about the possibility of making a sky dancer. I said YES and I already have a pattern. We discussed colors and styles of dress and three weeks later, the studio has its very own custom sky dancer for events!

Elvis Costello puppet (7/21)
Paul Weller puppet (7/21)
I was speaking with my friend Rocky about the Conny Plank puppet I made and he said "IF I had any artistic ability whatsoever there would be Elvis Costello and Paul Weller ones.  They could fight for my heart, like Karate Kid.  Also if I wasn’t lazy.  Also if it wasn’t your brilliant idea." I told him I CAN DO THIS. These are a work in progress and all photos are offline until Rocky shoots an unboxing video (once the puppets are done and in the mail).

The Reverend Fred Lane puppet (7/21)
Thinking over the other persons I know who are visually iconic, very funny and may enjoy having a puppet of themselves (!), I reached out to Jeannie to ask if her husband Tim would get a kick out of having his very own puppet. She said YES HE WOULD, so this is also a work in progress. Photos are being taken of the process, but they too are offline until the big reveal.

This does not include the chronology of Sticker Mule deals unless this assemblage of order thumbnails counts...
stickermule

Tuesday, June 27, 2017

Düsseldorf, Tour De France, Kraftwerk, Air, Friends, Adventure, YES PLEASE!

Dusseldorf
Photo by @puthoor_photo via Flickr
In just a few hours, David and I will be boarding a plane to Frankfurt & then taking the train to Düsseldorf. Our wild Kraftwerk adventure is leading us to their home town to meet Jan Wiefels who wrote about our wedding in the Rheinische Post! He extended a pair of tickets for us to see Kraftwerk & Air & we booked our travel immediately. Who could say no to an opportunity like this (not us!)?!

Thorsten Schaar reached out to David and I, inviting us to take part in an International Press trip of Kraftwerk and the Grand Depárt (the start of the Tour de France). David is writing an article on the event for Electronic Beats magazine and I'll be their photographer for this story. I can't believe our good fortune. It all began with the pictures I took of David being posted to his Flickr photostream & now my own Flickr account was essential in establishing that I can shoot good pictures every now and then!

Friends of ours will be joining us in Düsseldorf (Marshall, Les, Hilde & our very own Scott Stapleton!) Friday, Saturday and Sunday we'll be with the press group. The members of the International press we're traveling with are authors, musicians, magazine founders, literary agents and sports writers. It's sure to be an interesting group of people.

Many, many photos will be taken. I'm bringing my Polaroid Spectra, Sony a6000 & my trusty Pentax 110 (of course!). My purse/camera bag is heavy with lenses, spare batteries, film and my FauxPro.

Gifts were made with my handy dandy new Cricut machine! So many t-shirts!!!


Tuesday, April 5, 2016

DIY Copy of Houzz Consigned Chinese Black and Red Moon Face Nightstand

People need a horizontal surface to put things on next to the bed. Not having nightstands was a glaring omission from our AirBnB. I did some googling to rectify this situation and found a set of nightstands that would match the overall Japanese/red-black theme of the apartment.

Well, I found these gorgeous nightstands on Houzz, but there's no way I'm willing to pay $900 for two (let alone $450 for one)!


I had an idea to find the cabinet hardware from Aliexpress (which was pretty simple) and then make the nightstands out of plywood with faux door and drawer openings. I don't need storage space in these nightstands, I just needed a place for people to put their things by the bedside. I used a big piece of paper to work out the balance of the drawer to door spacing for the front of the cabinet and traced on the lines with a pencil. Then using a chisel and a hammer, I made a groove on the fronts and sides of the cabinet where the "doors" and "drawer" would be. The plan was to fill in the groove with gold paint as the last step.


I used Rust-Oleum semi-gloss black paint for the body of the nightstand (the same paint I used on the headboard frame) and a red enamel paint for the drawer/doors.


After adding several coats of paint, I sanded with a 440 grit and then painted again. The door/drawer hardware arrived in the mail eventually. I installed the hardware and then painted the grooves gold with a fine tipped paintbrush and a gold paint I bought at Michael's.


I'm very pleased with how they turned out. They look great in the bedroom and the enamel paint is very hard wearing. I have about $100 or so in parts/paint/hardware invested in these nightstands, so it wasn't exactly cheap to make them, but it's certainly a lot cheaper than the ones for sale on Houzz.


Wednesday, March 9, 2016

From Concept To Reality - Queen Size Shadowbox Headboard

Say for example you've decide to join the bandwagon and turn the vacant apartment over the garage into an AirBNB (primarily because you don't want to be a full time landlord). All the AirBNB advice online says to make your place stand out, make it different, make it INSTAGRAM WORTHY. No pressure, right? Suure.

Through hitting up great estate sales, we'd settled in a Japanese theme for the apartment furnishings. Most of the furniture was in place and I'd already made the noren curtains for the front porch. The final thing I wanted to make a focal point was the headboard for the queen size bed. I'd researched ideas online but didn't find anything that fit with our theme. 

One morning I couldn't sleep. I woke up at 4:30 am, didn't want to get out of bed. I laid there and turned over ideas for a headboard in my mind. Discarding each iteration as taking too much time, costing too much in supplies or being far too complicated to execute.


I thought back to the geisha doll in a glass box that my mom used to have and thought THAT'S IT! I'll make a shadowbox headboard! I turned this idea over and over in my mind to imagine how it should look, what should be in the shadowbox? 

When it was a reasonable hour to get up, I went upstairs and drew the mock-up of the idea I had on my office whiteboard. The idea for the mountains, sun and cherry blossoms in the shadowbox came from the shutter stock banner graphics I purchased as inspiration for the noren curtains.


The noren curtains I made were inspired by those you see outside traditional ramen shops. I found UV resistant canvas fabric by the yard and a pattern (which I could modify).


Now that I've explained the history of the noren curtains, we can get back to the headboard. I then began researching where to buy a 30x60in piece of glass. Turns out a piece of glass that large is really, really heavy and expensive. Scratch that. Maybe clear vinyl might work? Researched that, found the stuff they put in sailboats for "windows". Nope. That's not right either. Turns out Lowes stocks 30x60 pieces of Duraplex for $45. Sold. That sheet of Duraplex is exactly the right size and won't require any cutting!

There's plenty of documentation online for how tall and wide a queen size headboard should be. I took that information along with the actual measurements of wood sold by Lowe's (a 2x4 isn't always 2x4) and began sketching out the pieces of wood I'd need to buy.
Many calculations later, I knew the finished headboard would be 57 1/4" tall, 23 1/4" from the bottom of the feet to the bottom of the shadowbox, and 65 1/2" wide. Basically I was centering the wood around the 30x60 Duraplex sheet and if anything wasn't quite centered, the nail holes would be covered up by the final trim I'd use to frame the edges of the Duraplex.
The sides of the shadowbox were 4x4 pressure treated fence posts and they were quite damp with the pressure treating chemical when I purchased them. I let them dry out for a few weeks (laying them flat on the garage floor). After two weeks' time, I cut the posts to size and sanded all the sides, prepping it for painting with Rust-Oleum Black Satin enamel paint.

I used a pocket jig for the screw holes because I didn't want screws to be visible from the outside of the headboard. I attached the top and bottom 1x4x10 board to the two 4x4 posts with two pocket jig/screw holes on each side (8 total, 4 top, 4 bottom). Not everything lined up perfectly, but I knew any imperfections wouldn't be visible once the headboard was complete, so I kept working. As long as all my wood was flush at the front of the shadowbox where the Duraplex would go, all would turn out well.

The shadowbox has tree branches (taken from the tree in the front yard) which I wrapped in strips of black satin (I already had 3 yards of inexpensive polyester satin on hand) and hot glue silk cherry blossom flowers to the branches (continuing the theme of cherry blossoms from the noren curtains on the porch). 


The background of the shadowbox would be a section of the canvas fabric I had left over from making the noren curtains, painted with imagery of a large red setting sun and a large black mountain range opposite the cherry blossoms. The paint I was working with is by Jacquard and worked extremely well with the outdoor UV-resistant canvas.


David gave me the great idea of illuminating the scene with an LED light kit from IKEA, giving our guests the option of having the ambient light on or off in the headboard with a simple toggle switch.
The backing of the headboard is a section of hardboard which I spray adhered the canvas fabric to once the painting was completed. Working on the flat concrete floor of the garage, I used a rolling pin to firmly adhere the canvas to the hardboard and flatten out any uneven areas. I trimmed off any excess fabric with a razor blade and then used shiny brass trunk nails to secure the hardboard to the frame of the headboard. (no photos taken of this process as it took two people and four quick hands to apply the spray glue and smooth out any lumpy areas!
 
I used Gorilla Glue to secure the branches into a section of styrofoam glued to what would become the inside base of the shadowbox. I used strips of masking tape to hold the branches at the desired angles and depths while the glue set.
Once the glue was cured, I could then begin to attach the silk cherry blossoms to the branches. These are technically peach blossoms, but they had the look and colors I desired.

I used a snap blade knife to carve away some of the styrofoam rectangle, giving the base of the branches a more organic shape. Using the same black satin material, I cut a large rectangular section of cloth and began to cover the styrofoam base with it, securing the fabric with sewing pins.
Using the hot air from an embossing tool (rather than a heat gun, which would be too hot), I was able to make the frayed edges of the fabric covering the branches appear less messy. The hot air made the frayed edges shrink/melt/vanish.


The lighting section from IKEA was the perfect length to fill the center of the shadowbox with ambient light from beneath.

I drilled small holes every few inches apart at the perimeter of the Duraplex sheet. The diameter of the drill bit was big enough to allow for a small finishing nail, but not so large that the head of the nail would pass through the drilled opening. The sheet of Duraplex was affixed to the front of the shadowbox with finishing nails and David sealed any openings with crystal clear caulk (so no little critters could make a home inside the shadowbox).

The wood framing the front of the Duraplex sheet is a decorative pine trim from Lowe's, miter cut at the corners and an extra strip of thinner, similar wood trim at the bottom of the shadowbox to further obscure the light source.

The fence post finials are the Harbor design from Home Lumber Company on eBay. I bought the 4x4 size but I should've ordered the smaller size due to the dimensions of the fence posts not really being 4x4 but are 3.5x3.5. Not a huge problem overall.

I'm extremely pleased with how this project turned out! It has been a long time since I dreamed up something I wanted to make and had the time/ability/skills to see it to fruition! 


 There are still a few little things the AirBNB needs (end tables for the bed, for one) but overall it is nicely kitted out. The rest of the pictures of the place are on AirBNB!: http://bit.ly/minshuku