Showing posts with label rain lamp. Show all posts

Friday, September 10, 2021

Rain Lamp Peak Plastic Fail and What You Can Do About It


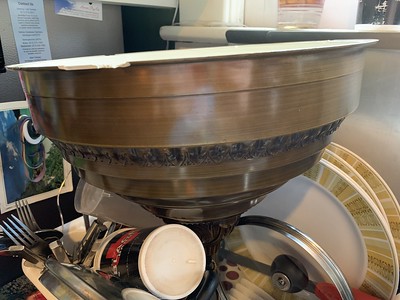
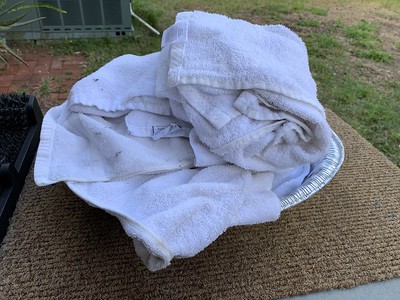
Way back in April of 2019 the bottom of our rain lamp fell out and dropped 4 quarts of mineral oil on the dining room floor. The cleanup required a mountain of towels which will never come clean and will only ever be useful to turn sticks into torches. We were dismayed and uncertain as to how to fix the cracked plastic. The rain lamp base is the oil reservoir and attaches to the base of the rain lamp with three small bolts and acorn washers. The attach point for each bolt had completely disintegrated and there is no way I would trust a two-part epoxy to support the weight of 4 quarts of mineral oil.

Rain Lamp Cleanup

Rain Lamp Rag Pile

What did I do? I put off trying to fix it for ages (literally years). I had the idea to get a ring cut out of aluminum or sheet metal from a fab shop, but I was dubious that a shop would want to do a small one-off piece for a reasonable amount of money. The prospect of me cutting out a completely symmetric circle from a piece of sheet metal with a dremel was well outside of what I wanted to spend my time doing, so I just didn't do it.

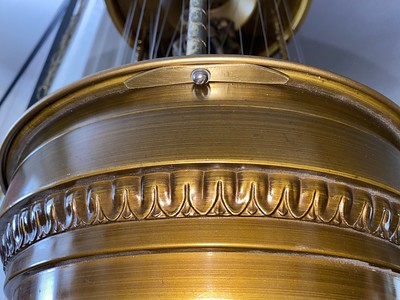
Fast forward to the middle of the pandemic. I saw a person in the neighborhood with a 3D printer printing up loads of standoffs for face mask shields. I reached out to him and asked about the probability of him 3D printing a potential solution for my rain lamp problem. He said he'd try, and eventually I received three different shim types from him. One of the three shims seemed like it would work, but I only ever got the one shim 3D printed from him (I needed 3) and he hadn't responded to a message I'd sent in over five months. I took the one workable shim prototype and used it to cut 3 shims out of some K-S brass strips I had from another project.

rainlamp

IMG_2379

With my husband's help, we sanded down the shims to fit under the lip of the oil reservoir, marked and drilled the bolt holes for each of them, and reassembled the rain lamp with new, improved non-disintegrating, weight distributing brass bolt supports.

IMG_3351


If you have a rain lamp, beware that it is probably reaching peak plastic brittleness and you could find yourself with 4 quarts of mineral oil on your dining room floor. We were lucky that it happened while we were home, awake, and could quickly mitigate the large pool of mineral oil that hit the floor. If your lamp hasn't bottomed out yet, perhaps you should take a few moments and make some shims to prevent against a mineral oil disaster in your own home.

If you need to restring your oil rain lamp, I have a how-to for just that very thing!

Friday, August 21, 2015

How To Restring an Oil Rain Lamp

I am the proud new owner of a Creators Three Goddess Oil Rain Lamp! Sadly, one of the monofilament line got broken during shipping and I had the seemingly odious task of restringing the lamp foist upon me.

Searching online yielded very little information about how to take apart the lamp and what to expect upon doing so. There are two PDFs online describing the process of restringing and one describing repair of the lamp, how much mineral oil to use, but none with helpful photos.

Prior to taking apart the lamp, spread out a large trash bag  or plastic sheeting to catch any oil which might still be in the bottom of the lamp.

Disassembling the lamp is done by removing the three brass acorn nuts which hold the bottom of the lamp (the oil reservoir) to the center portion of the lamp. The lamp pump assembly is affixed to the bottom of the center portion of the lamp. Unscrew the top nut of the lamp where it joins the electrical cord/chain and slide it down the electrical cord and away from the lamp center. Working on the lamp from a position where the lamp is still suspended in mid-air is extremely helpful. Tying a knot in the electrical cord at the top of the lamp will allow you to suspend the lamp while you work on it.


The monofilament line is held taut by a series of interlocking brass couplings. The larger, outer brass couplings are the portion you can see sticking out of the top of the lamp, where the monofilament line appears to come out of the top of the lamp.


The smaller brass coupling is what holds the monofilament lines taut as the filament is threaded through the holes in the bottom of the lamp base and then back into the brass coupling in the top of the lamp. Make note of the threading pattern, you will replicate this pattern when you're replacing the monofilament line.


Using a small chisel or tool with a beveled edge, pry the smaller fitting out of the center of the larger fitting. Collect all small fittings and place them in a lidded container containing a mix of hot water and Fantastik (or some other grease cutting cleaner). Once all of the small fittings have been removed, remove the monofilament line from the lamp by unthreading it from the holes. Remove all large brass fittings and place them in a lidded container with a grease cutting mixture and let them soak. Clean the center of each small brass fitting, ensuring there are no clogs or blockages present. Set aside the small brass fittings to dry. Repeat the cleaning process with the large brass fittings. 

When all fittings have been cleaned thoroughly, restringing the lamp can begin. Work from the inside out to make the process simpler.
I tied the "starter" end of the monofilament line to a pencil to keep a good length of filament on the bottom of the lamp so I wouldn't have difficulty making a good knot in the filament when I'd finished threading it through the lamp.


I used 40 pound clear, monofilament line to restring this lamp. Monofilament line is also commonly referred to as fishing line. Do not use anything heaver than a 40 pound line, as you will have difficulty reinserting the smaller brass couplings (I'll cover this a few paragraphs later).

The inner circle rain pattern on this lamp is diagonal. The filament was threaded from the bottom of the lamp and then two holes to the right of the hole which would create a vertical rain line. The length of the inner circle rain pattern filament line was approximately 24 feet in length. This length will allow for a foot or so extra length at the bottom. This will make knotting the thread at the end easier.

The outer circle rain pattern on this lamp is vertical. The filament was threaded from the bottom of the lamp and straight up into the hole in the top to create vertical rain lines. The length of the outer circle rain pattern filament line was approximately 40 feet in length. This length will allow for a foot or so extra length at the bottom. This will make knotting the thread at the end easier.

Each run of filament is tightened by pulling on the filament enough to stretch it enough to allow you to press the small brass fitting into the larger brass fitting with the filament pinched in the center. As the filament is pulled/stretched, the diameter of the monofilament will decrease by a very small amount, allowing you to pinch the filament in place with the smaller brass fitting. Use a tiny hammer to tap the smaller brass fitting into place. It does not require much force, tap gently.

When you've successfully threaded the new monofilament line through the lamp, tie a knot in the filament underneath the center of the lamp. Tying three tight knots, one after the other will be sufficient to keep the filament in place.

The oil ran lamp uses mineral oil to give the effect of rain drops cascading down the monofilament line. Mineral oil is readily available at drug stores or grocery stores. The typical cost of a pint of mineral oil is just over $5.00. The lamp will take about 2 pints to fully submerge the intake hose of the pump in the base of the lamp (2 pints = 32 ounces). This equals ~$15 in mineral oil. People are selling 32 ounce bottles of mineral oil labeled as Rain Lamp Oil for $24.95 plus $13.00 S&H. Don't be pulled in by this tactic! Buy your oil rain lamp oil from your nearest grocery/drug store! 

If the pump is the problem with your rain lamp, replacement pumps have been seen selling on eBay for $65.00 plus S&H.